Google Merchant Centre is the tool you need to get your products listed on Google Shopping. It allows customers to see exactly what you sell right when they search. This guide will show you how to set up your account easily and correctly, so you can start reaching more buyers today. In this guide, we will explain in detail how to set up Google Merchant Centre in 2026.
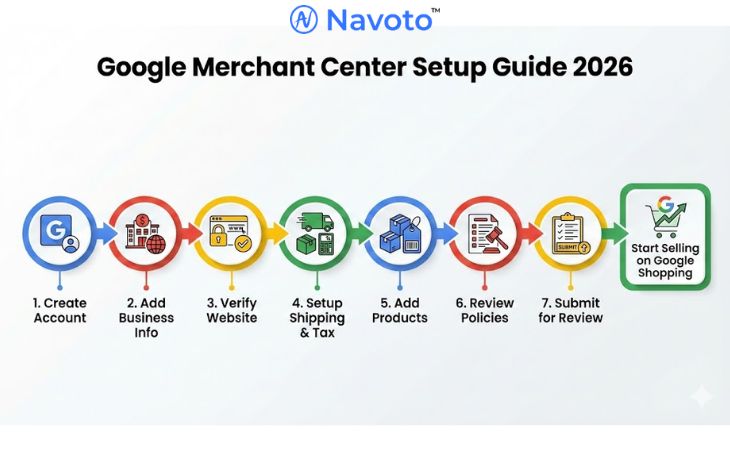
Simple Steps for Setting Up Google Merchant Center
So, let’s start to understand how to set up Google Merchant Centre.
Let’s start with the creation process:
Step 1: Create A Google Merchant Center Account
Sign in or Sign up to your Google Merchant Center account. You will need a standard Google Account to begin. Once logged in, Google will ask for your basic business information. Enter your Business Name exactly as it appears on your website and select your Business Country (where your business is legally registered).
Note:This is the most recent version of Google Merchant Center, which includes additional enhancements.
You have the option to revert to this version if you would like to continue utilizing the older version of Google Merchant Centre, which is known as Classic. Following that, in Google Merchant Centre, both the information about your company and the Merchant Centre ID can be found in the upper right-hand corner of your screen. You will now notice a panel on the left side of the screen. In this section, you will be providing all of the information that pertains to your online business.
Step 2: Adding Contact Information and Business Information
The specific business details that you must submit will depending on the type of business you are starting. To ensure you include all necessary information, carefully follow Google’s instructions.
Follow these steps to fill in business information:
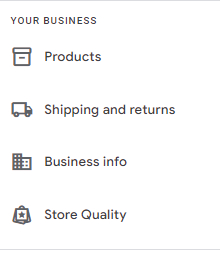
- Click the ‘Business Info’ button on the left side panel. Please go to info > Business info and then choose that area. Make changes to the company’s specifications.
- For shopping ads, you must add your company’s name, address, verification information, and customer service information.

- After that Go to Stores and add a Profile to create a Google Business Profile.
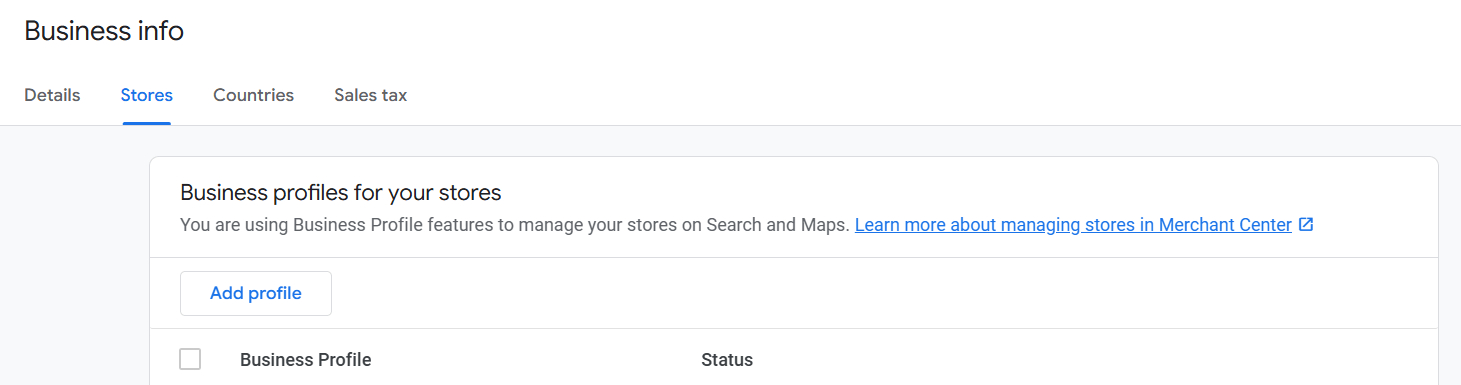
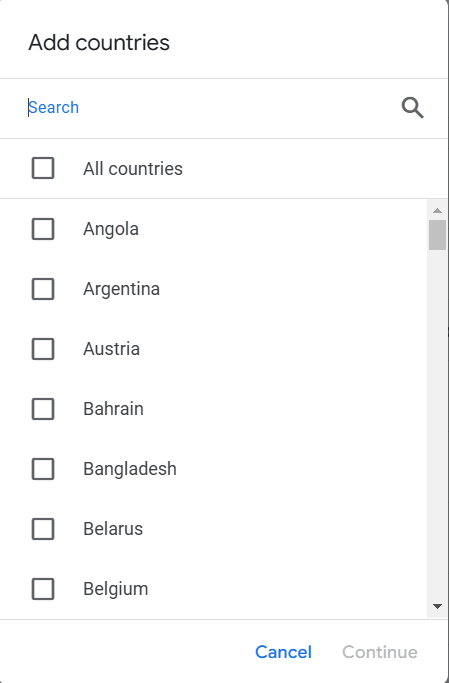
- Once it is completed you have to select the country where you want to sell your product.
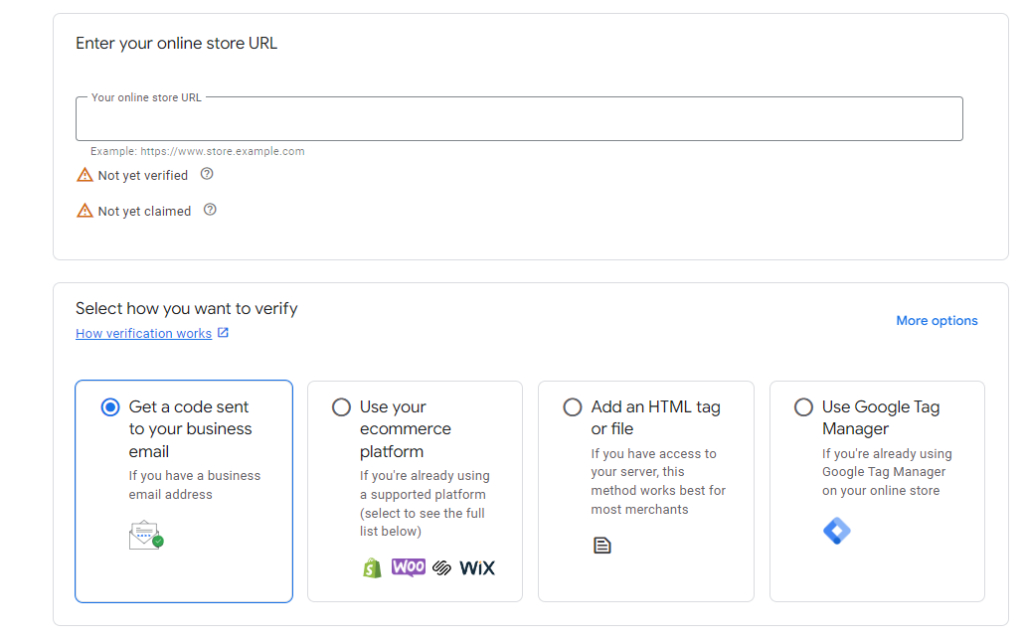
Step 3: Need to verify your store website
Google requires website verification to confirm ownership and link your store to the Merchant Centre account. Choose from these simple methods based on your setup:
- Email code: Google sends a verification code to your business email—enter it directly.
- E-commerce platform: Shopify/WooCommerce auto-verifies via app integration (easiest for most users).
- HTML tag: Copy-paste Google’s meta tag into your site’s <head> section.
- HTML file: Upload Google’s provided file to your root directory.
- Google Tag Manager/Analytics: Use the existing GTM container or GA4 property with admin access for automatic verification.
Before claiming your website, ensure it meets Google’s strict requirements to avoid verification failures or suspensions:
- Clear contact info: Display phone, email, contact form, or social links with response hours (e.g., “Mon-Fri 9AM-6PM”).
- Secure checkout: Full SSL (https:// everywhere), valid certificate—no “SSL pending” errors on Shopify.
- Payment options: Offer credit/debit cards, PayPal, invoicing, or cash on delivery (at least one).
- Returns policy: Detail process, timeframe (e.g., 30 days), conditions, refund method. Clearly state if no returns accepted—don’t hide it.
- Billing terms: Show all costs, payment models, and post-purchase charges upfront.
- Smooth checkout: Easy add-to-cart > complete purchase flow—no dead ends or missing steps.
To verify: Business information > Details > Online store > Enter URL > Pick method (HTML/email/platform).
Google checks instantly for platforms like Shopify; HTML methods need 24-48 hours. Success shows green check—proceed to shipping setup.
Step 4: Setting Up Shipping And Sales Tax
Now it’s time to set up the shipping & returns and sales tax. Here is the simple steps:
- In the left side, click to Shipping & Returns > Shipping Policies. For return policies, click to the Return Policies tab.
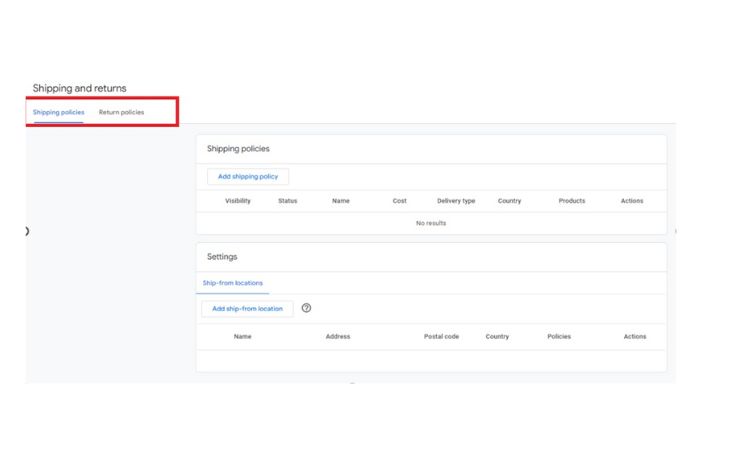
Follow the instructions and enter accurate online store and business info.
Your Returns & Refund Policy should be clear on how you handle returns and refunds, including:
- What step required to do for user
- Terms and Conditions of returns and refunds.
- Timeframe for returns.
- The refund window for your user.
Shipping costs, times, and information should also be included.
Shipping (what to mention)
- Where you ship
- Shipping cost (free/flat/carrier-based)
- Handling time (prep time)
- Delivery time (transit time)
- Total delivery estimate (handling + transit)
Sales tax
- Google may suggest tax settings based on your location.
- Choose Automatic (Google calculates) or Manual (you set rates).
- Decide if shipping/handling is taxable and match your checkout.
Step 5: How to Add Products To Google Merchant Center
Ways to add products to Google Merchant Center:
- Connect Shopify
- Use a Google Sheets template
- Add products one-by-one manually
- Upload/provide a product feed (CSV/TSV/XML or scheduled fetch)
- Use the Content API
- Enable Automatic product submission (Google pulls from your site if eligible)
Before uploading your products via the Merchant Centre, make sure your product data meets Google’s product data specifications.
Now, let’s look at the various methods you can use to add products:
First, navigate to Products > All Products > Add Products.
We’ll now go over two common ways to upload products on the platform:
- Adding Items Individually
You can add each online store product to the Merchant Centre. How to do it:
- Navigate to ‘Products’ in the left menu panel and click ‘All products.’
- Next, click “Add products” and select individual products.
- Enter product details in all fields.
Suppose your product has several colours, genders, ages, sizes, materials, and designs. Select the properties and values that differentiate variant items.
Finally, click save.
- Product Feed Creation/Upload
Product feeds contain product lists, attributes, and information. The Merchant Centre accepts primary and supplemental feeds.
Adding a primary feed serves as the main data source for your inventory. Additional feeds may not be needed if all products in your primary Feed fulfil the Merchant Centre’s data and eligibility standards.
Steps to add a primary feed:
- Select Products > All Products > Add Product.
- Choose ‘Add Products from a file.’
- Add the feed URL or upload the file. Update the timetable and add authentication.
Remember: Google Merchant Centre scheduling automatically obtains product data from a server.
- Choose a country and language. Select the networks you want to promote your products on. Then click Continue.
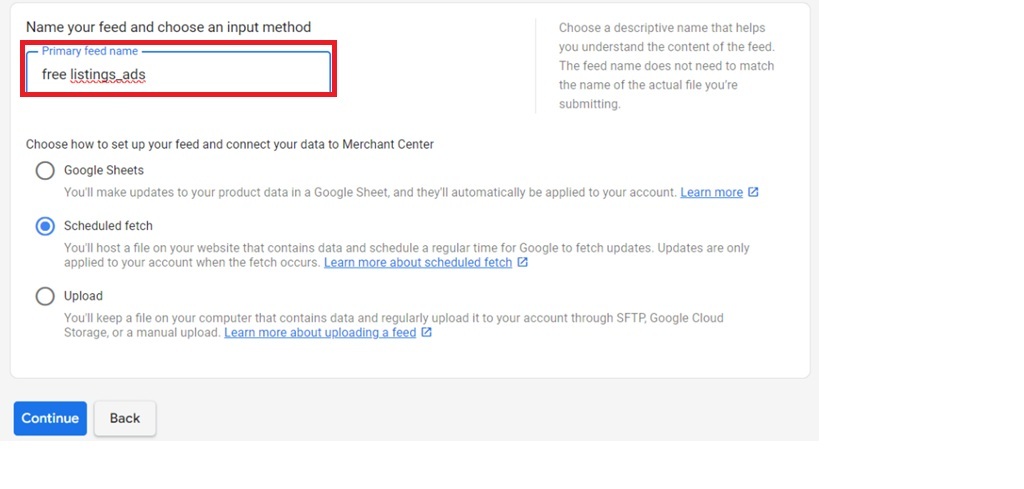
- Name your Feed and choose a fetching type.
- Upload your feed file after naming it. Finally, click Create Feed.
Your main product feed is ready.
Add Supplemental Feed
The only purpose of supplemental feeds is to update product data that already exists in one or more primary feeds. It is possible to have many supplemental feeds, each of which can update data from any number of primary feeds.
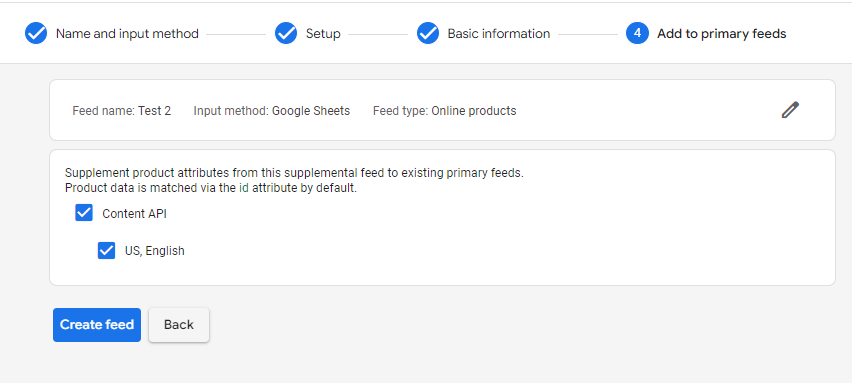
The name of the supplemental feed and the mechanism to retrieve it will be required. Create the feed and provide the necessary information.
Step 6: Review Google Policies
Check Google’s Ads policies—no counterfeits, dangerous items, or misleading claims. Compliance ensures safe shopping and blocks disapprovals like misrepresentation.
Step 7: Submit Your Merchant Centre for Review
Once your account is created, add products, comply with Google’s policies, and submit for review. If you follow all Google policies, your merchant centre disapproval rate will be zero.
You will encounter a prompt directing you to submit your account for review. Select it, and Google will assess and approve your account. This is how to set up Google Merchant Centre, and now that it’s ready! You can now easily sell your products across the Google Display Network.
Follow the Guidelines of the Google Merchant Centre
To use the Google Merchant Centre platform and Google Shopping for ads and profiles, merchants must follow Google’s rules. These rules prevent the sale of harmful products and materials and ensure that advertising is safe and that customers have a good experience.
Google Merchant Center guidelines
- Follow Shopping Ads policies
- Don’t list prohibited items (e.g., counterfeit, dangerous, or “dishonest behavior” products).
- Avoid unsupported or policy-violating ad formats that can trigger suspension.
- Avoid prohibited practices
- No misrepresentation (misleading prices, availability, identity, or claims).
- No abusing the ad network.
- Handle customer data responsibly (no shady collection/use).
- Don’t sell restricted products (or follow restrictions)
- Examples: alcohol, adult content, gambling-related items, certain healthcare products, trademark/copyright-violating goods, political content, and other regulated categories.
- Only promote products available for direct purchase
- Ads/free listings must send users to a page where they can buy the product directly.
- No affiliate/PPC bridge links unless you’re part of an approved CSS program (where applicable).
- Use a supported language consistently
- Match the same language across:
- Your website
- Your product feed/data
- Your Merchant Center language settings
- If using multiple languages, submit separate, accurate product data and matching landing pages for each.
- Match the same language across:
- Collect user information securely
- Use HTTPS/SSL for checkout and any sensitive data.
- Don’t sell customer info.
- Don’t use people’s personal info/images in ads without consent.
- Don’t run “free item” incentives mainly to harvest personal data (allowed only in limited cases like purchase-based promos).
- Sign in regularly
Log in at least once every 14 months to keep the account active and avoid stale data issues.
- Disclose AI-generated titles/descriptions
If your product title/description is AI-generated, use:
-
-
- structured_title
- structured_description
-
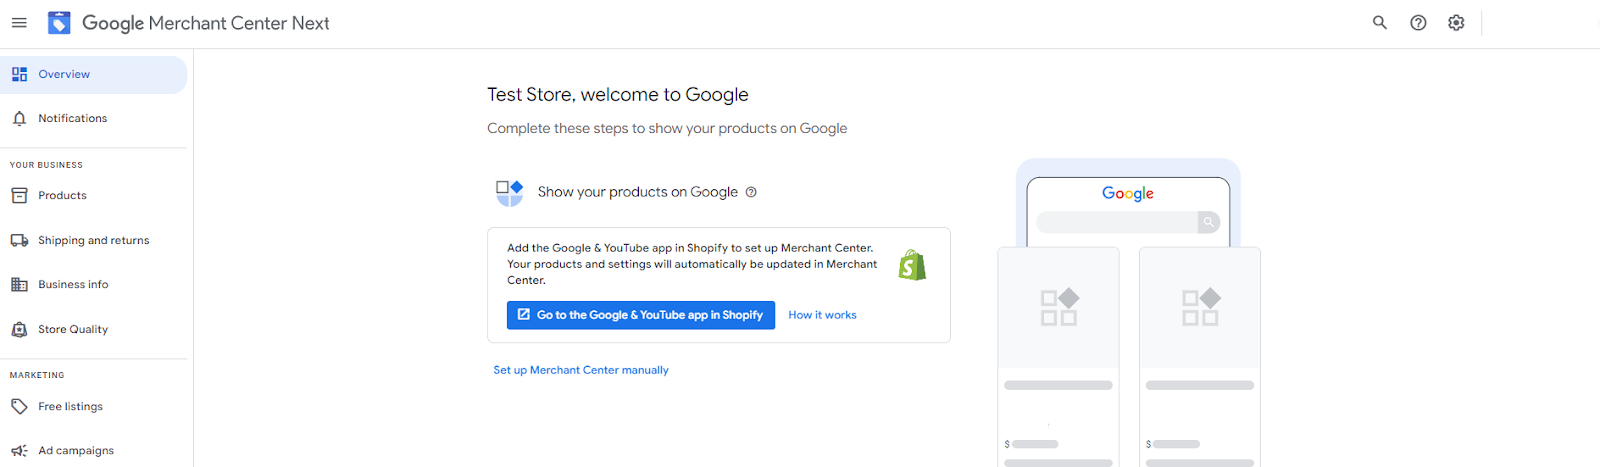
Google Merchant Centre may be integrated with Shopify using the Google & YouTube app. This link seamlessly syncs your Shopify products with Google Merchant Centre, making it easier to manage listings and run advertisements on Google Search, Shopping, Display, and YouTube.
Steps for connecting Shopify to Google Merchant Centre:
- Sign in to your Google Merchant Centre account and select “Go to the Google & YouTube app in Shopify.”
- You will be routed to your Shopify admin; when requested, install the app.
- Connect and link your Google account to your Shopify store.
- To complete the configuration, follow the on-screen instructions.
After setup is complete, your Shopify product feed will sync to Google Merchant Centre immediately. This automation updates your product data and enables you to set up and manage Google advertising without manually entering product feeds.
What to do after Setting Up Google Merchant Centre?
After setting up Google Merchant Centre, you can use Google Shopping, YouTube advertisements, Shopping campaigns, and more to increase brand recognition and conversions!
What to do after setup:
- Make Google Shopping Campaigns
- Merchant Centre-Google Ads integration.
- Create Shopping campaigns and organise products into ad and product groups for better management and optimization with linked accounts.
Product Feed Optimisation
Keep your product feed accurate, complete, and up to date. Your products’ search visibility and purchasing experience improve with an optimized feed.
Use Retargeting
Retargeting ads to past brand fans is easier. Retargeting works when a buyer abandons their cart and requires a reminder to buy. Dynamic remarketing advertising from Google boosts conversions and sales.
Inventory promotions and ads
Offer specials in the Merchant Centre to attract clients. Local Inventory Ads let nearby shoppers know your products are in-store.
Explore More Merchant Centre Features
Use Merchant Centre analytics and supplemental feeds to understand product performance. Performance Max assets can also optimize product ad listings. These advanced features can boost the competitiveness of your listings and campaigns.
Conclusion
In 2026, setting up Google Merchant Centre is no longer just a basic need. It’s also a essential tool for online stores that want to be seen, trusted, and make sales on Google Shopping, Search, YouTube, and Display. You can set yourself up for approval and long-term success by creating your account correctly, verifying your website, setting up shipping and tax, uploading accurate product data, and following Google’s rules. Google Merchant Centre can help you grow your online store and reach buyers who are really interested at the right time once it is linked to platforms like Shopify and set up with clean product feeds, sales, and remarketing.