
If you’re running Google Shopping ads and not seeing the returns you expected, you’re not alone. Most advertisers waste 30-60% of their budget on underperforming products, poor feed quality, and inefficient bidding strategies.
This guide will show you exactly how to fix that.
Why Shopping campaign optimization matters: Unlike search ads where you control keywords, Shopping ads rely entirely on your product feed and Google’s algorithm. A poorly optimized feed means Google shows your products for irrelevant searches, wasting your budget. Proper optimization puts your products in front of buyers ready to purchase, dramatically improving your return on ad spend (ROAS). Let’s dive into the exact strategies that separate profitable campaigns from money pits.
1. Product Feed Optimization: Your Foundation
Your product feed optimization is everything in Shopping campaigns. Google uses your feed data to match products to search queries. Better data = better matches = higher ROAS.
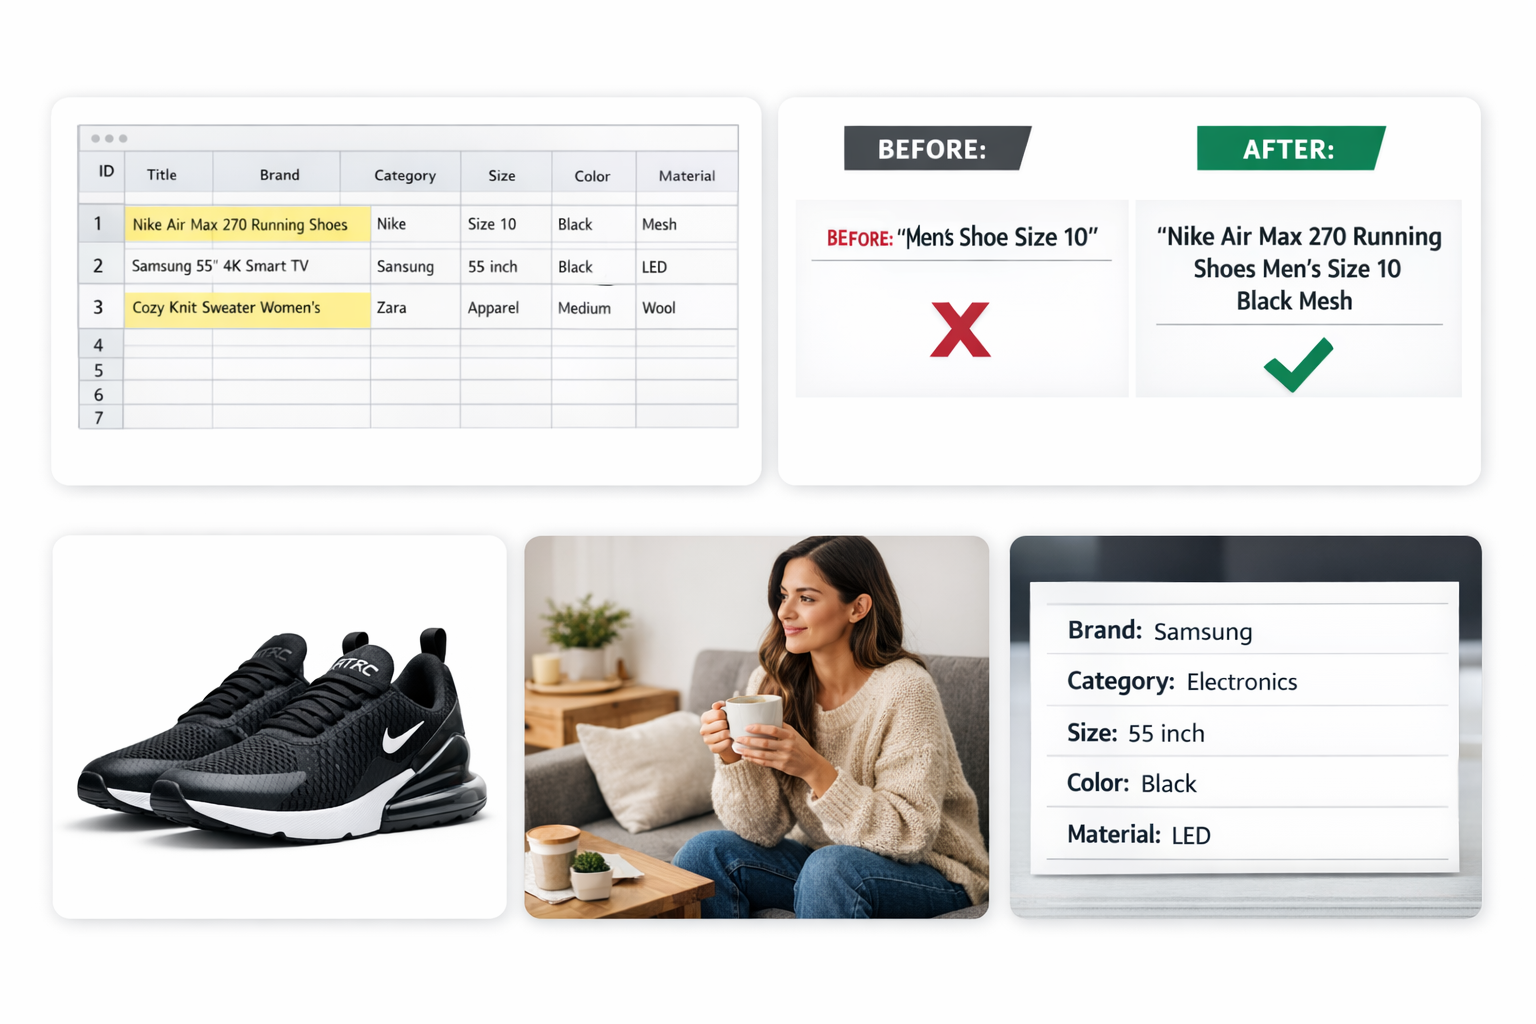
Product Titles
The rule: Front-load your titles with the most important attributes in this order:
- Brand (if well-known)
- Product type
- Key attributes (color, size, material, model)
- Secondary details
Bad title: “Men’s Shoe Size 10”
Good title: “Nike Air Max 270 Running Shoes Men’s Size 10 Black Breathable Mesh”
Why it works: This title matches searches for “Nike running shoes,” “Air Max 270,” “men’s black running shoes,” and “breathable running shoes size 10.” You’re covering multiple high-intent search variations.
Real example: An apparel retailer increased CTR by 47% simply by restructuring titles to include brand, category, and three key attributes instead of generic descriptions.
Product Descriptions
Google uses descriptions for search matching, especially for specific features.
Best practices:
- First 500 characters matter most
- Include dimensions, materials, use cases, and benefits
- Use natural language (how people actually search)
- Add technical specs for electronics and appliances
Example for a coffee maker: Instead of: “Great coffee maker with advanced features” Use: “12-cup programmable drip coffee maker with thermal carafe, keeps coffee hot for 4 hours, auto-shutoff, permanent filter included, stainless steel, ideal for home and office”
Image Quality
Your primary image determines whether someone clicks.
Requirements:
- Minimum 800×800 pixels (1200×1200 recommended)
- White or lifestyle background (test both)
- Product fills 75-85% of frame
- Multiple angles in additional_image_link
Pro tip: Products with lifestyle images alongside white background images get 23% higher CTR on average. Upload both and let Google test which performs better for different placements.
Custom Labels (The Secret Weapon)
Custom labels let you segment products for smarter bidding. You can create up to 5 custom labels per product.
Strategic labeling examples:
Custom_label_0: Margin tier
- High (>40% margin)
- Medium (20-40%)
- Low (<20%)
Custom_label_1: Performance tier (based on historical data)
- Best sellers
- Seasonal
- New products
- Clearance
Custom_label_2: Price tier
- Budget (<$50)
- Mid ($50-$150)
- Premium (>$150)
How to use them: Create separate ad groups for high-margin best sellers and bid aggressively. Create another for low-margin products and bid conservatively or exclude them entirely.
Real result: An electronics retailer used custom labels to separate high-margin accessories from low-margin core products. They increased bids 40% on accessories and decreased bids 30% on core products. Overall ROAS improved from 3.2 to 5.8 in 30 days.
Product Types
Don’t just use Google’s product categories. Add your own product_type hierarchy.
Example for a shoe store:
google_product_category: Apparel & Accessories > Shoes > Athletic Shoes
product_type: Men's Footwear > Running Shoes > Road Running
This gives you more granular control over bidding and lets you create tightly themed ad groups.
2. Campaign Structure: How to Organize for Maximum Control
Structure determines your ability to optimize. Poor structure means you’re flying blind. Here’s the proven framework.
The Priority System Strategy
Use campaign priorities (Low, Medium, High) to control which campaign serves for different search intents.
Three-tier setup:
Campaign 1: High Priority, Low Bids ($0.15-0.30)
- Catch-all campaign
- All products
- Captures cheap, broad traffic
- Use to discover new search terms
Medium Priority, Medium Bids ($0.40-0.80)
- Specific product groups
- Products segmented by performance or margin
- More targeted
Campaign 3: Low Priority, High Bids ($1.00-3.00+)
- Your best performers only
- High-margin products
- Brand searches
- Add converting search terms as negatives in Campaign 1 and 2, so they only serve here
How it works: When someone searches, Google first looks at your High Priority campaign. If that product is excluded (via negative keywords), it moves to Medium, then Low. This lets you bid differently based on search term quality.
Example: Someone searches “Nike Air Max 270 black size 10” (high-intent, specific). This triggers your Low Priority campaign at $2.50 CPC. Someone searches “running shoes” (broad, low-intent). This triggers your High Priority campaign at $0.25 CPC. You’re paying appropriate amounts for different search intents.
Single Product Ad Groups (SPAGs)
For your top 20% products (by revenue), create individual ad groups.
Why: Precise bid control. Product A might convert at $50 CPC, Product B at $1.50 CPC. Lumping them together means averaging bids and losing money.
How to set up:
- Identify your top revenue products
- Create a new ad group
- Set product filter to specific ID
- Set custom bid based on that product’s performance
When to use SPAGs:
- Products generating >$5,000/month in revenue
- High-margin items
- Products with very different price points
- Seasonal items requiring bid adjustments
Segmentation by Profitability
Don’t treat all products equally. Segment by what makes you money.
Create separate campaigns/ad groups for:
- High ROAS products (>400%)
- Medium ROAS (200-400%)
- Low ROAS (100-200%)
- Unprofitable (<100%)
Bid aggressively on high ROAS, moderately on medium, conservatively on low, and pause or minimize unprofitable unless they have strategic value (loss leaders, bundle items, etc.).
3. Bid Strategy: Getting Your Numbers Right
Bidding determines profitability. Too low and you get no traffic. Too high and you waste money.
Start with Manual CPC
When launching or testing, use manual CPC first.
Why: You learn what different products and search terms are actually worth before handing control to Google’s algorithm.
Starting bid formula: Average Order Value × Conversion Rate × Target ROAS × 0.01 = Starting Max CPC
Example:
- AOV: $100
- Conversion rate: 2%
- Target ROAS: 400% (you want $4 back per $1 spent)
- Max CPC: $100 × 0.02 × 0.25 = $0.50
Start here and adjust based on performance.
When to Switch to Target ROAS
Switch to automated Target ROAS bidding when:
- You have 30+ conversions in the last 30 days per campaign
- Your conversion tracking is accurate
- You’ve tested manual bidding and understand your numbers
How to set your target:
- Look at current ROAS in manual mode
- If you’re at 300% ROAS, start automated at 250% (slightly easier target)
- Let it run for 2-3 weeks
- Gradually increase target by 25-50 points every 2 weeks
Warning: Setting target ROAS too high too fast will kill your traffic. Google’s algorithm needs volume to learn. Ramp slowly.
Bid Adjustments That Actually Work
Device bid adjustments: Check performance by device (computer, mobile, tablet). If mobile converts at 30% lower rate, add a -30% mobile bid adjustment.
Location bid adjustments: Find your top-performing states/cities. Add +20-50% bid adjustments for high-performers, -30-50% for poor performers.
Real example: A furniture retailer found California delivered 5.2 ROAS vs. 2.1 ROAS nationwide average. They increased California bids by 40% and decreased bids in underperforming states by 50%. Total ROAS increased from 2.8 to 3.9.
Audience bid adjustments: Layer remarketing and customer match audiences on Shopping campaigns with +30-100% bid increases. These people already know you and convert 3-5x higher.
4. Negative Keywords: Stopping the Bleed
Google Ads keyword research helps uncover profitable search terms and negative keywords that prevent wasted spend in Shopping campaigns.
The Search Term Mining Process
Do this weekly:
- Go to Search Terms report
- Sort by spend (highest first)
- Look for terms with:
- Zero conversions after 10+ clicks
- High CPC but low conversion rate
- Irrelevant search intent
- Add as negative keywords
Common Negative Keyword Categories
“Free” and “cheap” seekers:
free
cheap
discount
coupon
clearance
sale
wholesale
Wrong product type: If you sell shoes, add:
socks
laces
insoles
shoe cleaner
Information seekers (not buyers):
how to
tutorial
diy
guide
review
compare
vs
Wrong specifications: If you only sell women’s products:
men
men's
boy
boys
The Price Exclusion Strategy
Add price-related negatives if shoppers are searching for price points you don’t serve.
Example: You sell premium coffee makers ($200-500). Add negatives:
under $50
under $100
budget
affordable
inexpensive
Real case: A luxury furniture store added “cheap,” “budget,” “under $500,” and “affordable” as negatives. CTR increased 12% and ROAS improved from 2.9 to 4.1 because they stopped paying for clicks from people who would never pay their prices.
Negative Keyword Lists
Create master negative lists you can apply to all campaigns:
List 1: Universal negatives (jobs, careers, how-to, etc.) List 2: Brand negatives (competitors you don’t sell) List 3: Product negatives (products you don’t carry)
Apply these at campaign level to save time.
5. Performance Analysis: What to Track and When
You can’t optimize what you don’t measure. Here’s what matters.
Daily Checks (5 minutes)
- Total spend vs. budget
- ROAS trend
- Any products with 0 impressions (feed issues)
Weekly Deep Dive (30-45 minutes)
Product performance:
- Export product report
- Add ROAS column
- Sort by spend (high to low)
- Identify:
- High spend, low ROAS (reduce bids or pause)
- Low spend, high ROAS (increase bids)
- High impressions, low CTR (improve images/titles/price)
- High CTR, low conversion rate (check landing page, pricing, reviews)
Search terms review:
- Find new negative keywords
- Identify high-converting terms
- Add high-converting terms as negatives in your catch-all campaigns so they only trigger premium campaigns
Geographic performance: Check if certain locations are draining budget with poor performance. Adjust bids accordingly.
Monthly Strategic Review (1-2 hours)
Competitive analysis:
- Use Google Auction Insights to see how you stack up
- If your impression share is low, consider budget or bid increases
- If you’re getting outranked, analyze competitor pricing and product offering
Seasonality planning: Identify products with seasonal trends. Prepare bid increases 2-3 weeks before seasonal peaks.
Feed quality check:
- Run feed diagnostics in Merchant Center
- Fix disapproved products
- Update out-of-stock items
- Refresh images for top products
The ROAS Diagnostic Framework
When ROAS drops, diagnose the issue:
If ROAS down + Conversions down = Traffic problem
- Fix: Check impression share, increase bids, expand product coverage
ROAS down + Conversions up = Efficiency problem
- Fix: You’re paying too much per click, review search terms and add negatives
ROAS same + Revenue down = Volume problem
- Fix: Increase budgets, expand product line, test new ad formats
If ROAS up + Revenue down = You’re too conservative
- Fix: Lower target ROAS, increase bids on proven winners
6. Scaling Winners: How to Grow Profitable Campaigns
Once you’ve found what works, scale intelligently.
The 20% Rule
Increase budgets and bids by maximum 20% every 3-5 days. Larger jumps destabilize Google’s learning and crater performance.
Example scaling plan:
- Week 1: $100/day budget, 3.5 ROAS
- Week 2: $120/day (+20%)
- Week 3: $145/day (+20%)
- Week 4: $175/day (+20%)
Monitor ROAS at each step. If it drops more than 15%, pause increases and optimize.
Expand High-Performing Product Categories
Found a winner category? Double down.
Steps:
- Identify product type with ROAS >500%
- Create dedicated campaign for this category
- Source more products in this category
- Increase bids 30-50% vs. your general campaigns
- Allocate higher daily budget
Real example: A pet supplies retailer discovered automatic cat feeders had 7.2 ROAS while general pet supplies averaged 3.1. They created a dedicated campaign, expanded from 8 feeder SKUs to 35, and increased daily budget from $50 to $300. This campaign alone generated $140K additional profit in 90 days.
Geographic Expansion
Once you’re profitable in core markets:
- Analyze international viability
- Set up country-specific campaigns
- Adjust pricing for local markets
- Translate product feeds if needed
Start with English-speaking countries (UK, Canada, Australia) for easiest expansion.
The Waterfall Budgeting Method
Allocate budgets based on proven performance:
Tier 1 campaigns (ROAS >500%): Unlimited budget Tier 2 campaigns (ROAS 300-500%): 60% of total budget Tier 3 campaigns (ROAS 150-300%): 30% of total budget Tier 4 campaigns (ROAS <150%): 10% for testing only
Rebalance monthly as products move between tiers.
Common Mistakes and How to Fix Them
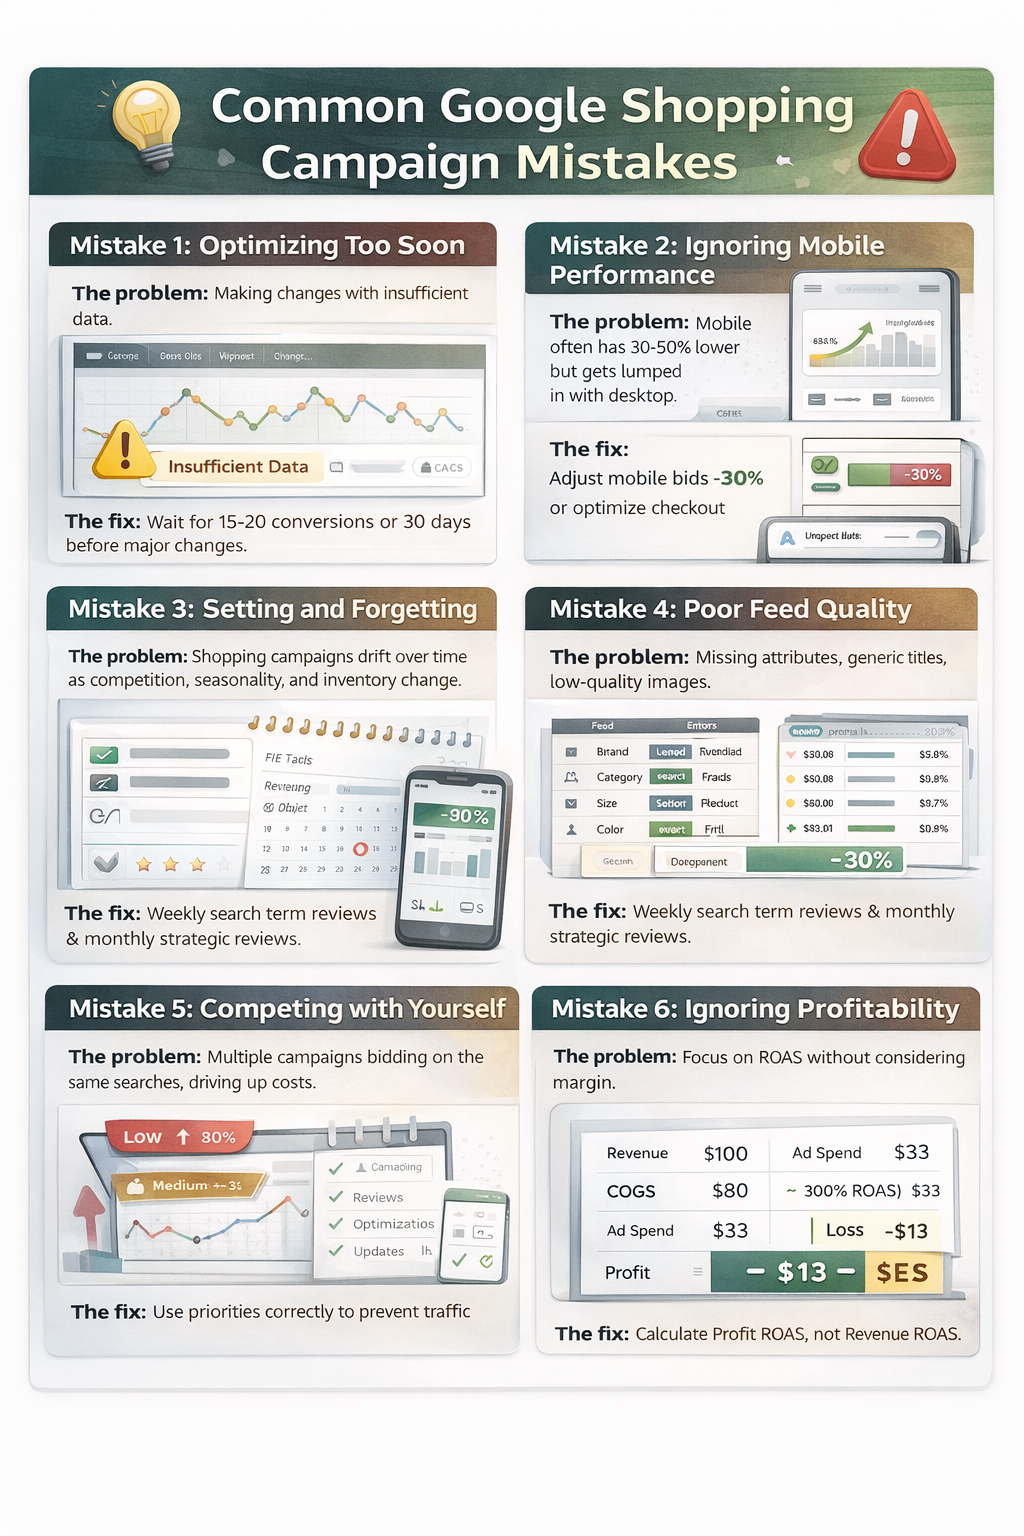
Here are the most common Google Ads mistakes to avoid for better performance and higher ROAS.
Mistake 1: Optimizing Too Soon
The problem: Making changes with insufficient data.
The fix: Wait for at least 15-20 conversions or 30 days (whichever comes first) before major changes. Google’s algorithm needs time to learn. Making daily changes resets learning and prevents optimization.
Mistake 2: Ignoring Mobile Performance
The problem: Mobile often has 30-50% lower conversion rates but gets lumped in with desktop.
The fix: Review performance by device. If mobile converts poorly, either reduce mobile bids by 30-50% or optimize your mobile checkout experience to improve conversion rate.
Mistake 3: Setting and Forgetting
The problem: Shopping campaigns drift over time as competition, seasonality, and inventory change.
The fix: Schedule recurring optimization sessions. Minimum weekly search term reviews and monthly strategic reviews.
Mistake 4: Poor Feed Quality
The problem: Missing attributes, generic titles, low-quality images.
The fix: Audit your feed monthly using Google Merchant Center diagnostics. Aim for 0 disapprovals and 0 warnings. Use all available product attributes.
Quick test: Compare your product feed to your top 3 competitors. If theirs has more detail, you’re losing.
Mistake 5: Competing with Yourself
The problem: Multiple campaigns bidding on the same searches, driving up your own costs.
The fix: Use the priority system correctly. Add converting search terms as negatives in lower-priority campaigns so only your highest-bid campaign serves premium traffic.
Mistake 6: Ignoring Profitability
The problem: Focusing on ROAS without considering margin.
The fix: Calculate profit ROAS, not just revenue ROAS.
Formula: Profit ROAS = (Revenue – COGS – Ad Spend) / Ad Spend
A product with $100 revenue and $80 COGS at 300% ROAS is actually unprofitable.
- Revenue: $100
- COGS: $80
- Ad spend: $33 (to get 300% ROAS)
- Profit: $100 – $80 – $33 = -$13 (losing money!)
Focus on profit, not vanity metrics.
Mistake 7: Not Using Merchant Center Promotions
The problem: Missing out on special badges that increase CTR.
The fix: Set up Merchant Promotions for sales, free shipping, percentage off. Products with promotion badges get 15-25% higher CTR.
Advanced Tactics for Experienced Advertisers
Dynamic Remarketing for Shopping
Layer remarketing audiences on Shopping campaigns:
- Create audience lists (cart abandoners, product viewers, past purchasers)
- Add to Shopping campaigns as “Observation” mode
- Set bid adjustments +50-150% for warm audiences
- Create Shopping remarketing campaigns exclusively targeting these audiences with higher bids
Result: 3-5x higher ROAS on remarketing traffic.
Competitive Conquest Strategy
Target competitor brand searches:
- Identify direct competitors
- Create dedicated campaign
- Use aggressive bids (your conversion rate will be lower, but you steal traffic)
- Ensure your pricing is competitive when shown next to competitor
- Use promotional badges to stand out
Warning: This works best when you have comparable or better pricing. If you’re 20% more expensive, you’ll waste money.
Seasonal Bid Curves
For products with predictable seasonality:
- Chart historical performance by week
- Create bid multiplier curve (e.g., Valentine’s Day flowers: 0.5x in summer, 3x in early February)
- Implement automated scripts to adjust bids based on time of year
Example: A costume retailer increases Halloween product bids by 10% each week from August through mid-October, then reduces by 20% daily after Halloween. This automated approach improved profitability by 89% vs. static bids.
Quick Action Checklist
Use this to audit your campaigns monthly:
Feed Optimization
- [ ] Product titles include brand + type + 3 key attributes
- [ ] Images are minimum 1200×1200 pixels
- [ ] All available product attributes are filled
- [ ] Custom labels are set up for margin and performance tiers
- [ ] No disapproved products in Merchant Center
Campaign Structure
- [ ] Using priority system (high, medium, low) to control traffic flow
- [ ] Top 20% products in separate ad groups with custom bids
- [ ] Products segmented by profitability
Bidding
- [ ] Manual CPC if under 30 conversions/month, Target ROAS if above
- [ ] Device bid adjustments based on performance data
- [ ] Location bid adjustments for top/bottom performing regions
- [ ] Audience layering with bid increases for warm traffic
Negative Keywords
- [ ] Weekly search term review completed
- [ ] Negative keyword lists applied to all campaigns
- [ ] Price-related negatives if you’re premium/budget brand
- [ ] Information-seeking queries added as negatives
Performance Monitoring
- [ ] ROAS by product tracked and reviewed
- [ ] Low ROAS products paused or bid reduced
- [ ] High ROAS products scaled with budget increases
- [ ] Geographic performance analyzed
Scaling
- [ ] Budget increases capped at 20% every 3-5 days
- [ ] Winning product categories identified and expanded
- [ ] Merchant Promotions active for relevant products
Final Thoughts
Google Shopping optimization isn’t a one-time task. It’s an ongoing process of testing, measuring, and refining. The advertisers who win are those who treat optimization as a system, not a sporadic effort.
Start here:
- Fix your product feed (biggest impact, often overlooked)
- Implement the priority campaign structure
- Add negative keywords weekly
- Scale what’s working by 20% at a time
Do these four things consistently, and you’ll outperform 80% of Shopping advertisers within 90 days.
The difference between a 2.5 ROAS campaign and a 6.0 ROAS campaign isn’t secret tactics or huge budgets. It’s attention to detail, consistent optimization, and strategic reinvestment in what’s proven to work. Now go execute.